One Step at a Time

I’m feeling overwhelmed. I imagine I’ll feel this way, off and on, until things are turned in for Crown’s A&S.

At last it comes, this Crushing wave of overwhelm Immobilizing

Dashed upon the rocky shore The sea will always retreat.

I’m trying to focus on just the next step, but I do want to break down the rest of the uwagi lining so I can keep the next step straight.

Thread mark the migoro. Complete.

Pin okumi to migoro. Essentially done. I have them pinned on with the pins running horizontally on top of the stitch line. I’ll re-pin vertically in sections as I sew.

Sew okumi. One is attached. I’ll finish the other (which is fully prepped and re-pinned) before I quit for the night.

I guess this means the collar and sleeves get squished together into the same day.

So tomorrow will be Press all seams. Mark the collar. Pin the collar. Stitch the collar on. Mark the sleeves. Sew the sleeves. Pin the sleeves. Stitch the sleeves on.

I did manage to finish something else though. My documentation had one last step, the conclusion. I had a list of things I’d learned as an outline. I thought of a line that I wanted to include, so I popped into the document and before I knew it, my list had transformed into a handful of paragraphs and I had a mostly done paper. And it’s actually calming my overwhelm a little. I know I could turn my documentation in right now and it would be just fine. I’ll still go over it one last time after I update the uwagi section, but it’s essentially done. Wow.

Overlap

Last night I finished edging the migoro at the center front opening. I was up much too late, but the work is done.

Let’s see if I can think through all the steps for okumi attachment. What needs to be marked on the migoro (body) has been marked in fabric pencil. I need to mark out the lines on the okumi (overlap). Once I have the lines marked, I’ll thread mark the pencil lines so they’re visible on both sides of the fabric. Then it’s pinning and stitching.

Sounds doable.

OH! but there is actually one other thing! The okumi have a raw edge. I’ll need to hem those edges so they don’t fray. Insert that task either before or after thread marking.

Now we’ve hit the it’ll be impressive to get that done today stage. But that’s ok. I’ve set the collar and the sleeves each on their own days, so if there’s a little bleed over from the okumi step on to another day, that day’s task should be able to share. I hope.

I’m really trying to get the lining complete by New Year’s Eve.

The sun stretches out Long fingers of colourful  Clouds as she departs

A dear friend waving farewell I’ll see you in the morning.

Let’s Race

I’m trying to be very careful. I can not afford to make mistakes at this point. There’s less than two weeks to go. Pressure just redoubled. I know they sought out and found judges for my entry. That’s both exciting and terrifying.

Time to stab fabric. Goals for the day: (1) finish the edge of the migoro (body panel), (2) mark out the seam lines for the okumi (overlap panels) attachment, (3) attach the okumi.

If anyone needs me, I’ll be on the couch under a pile of silk.

When has the pressure Become just too much to bear? I feel it creeping

It stalks like a predator Cold eyes shining in the dark

The poems have been a good outlet for my anxiety.

The migoro has a finished edge and the stitch lines are marked out for the okumi attachment. And now we have a brief pause while I edge a different part of the migoro where I cut it open – this is the front center, the edges where the okumi attach. Fun times.

Third time is the charm, looks like the okumi will be attached tomorrow.

No Stress Side Seams

As I write this, I have yet to put needle to fabric and it’s almost 8pm. I had an errand today that zapped my energy. I have the silk folded and ready for it’s next stitches and couldn’t manage to thread a needle.

How to keep going When motivation falters And you want to stop?

Return to the beginning Find or rekindle the spark.

So I opened up my documentation. I polished the text. Moved images from the bibliography to the body to make it easier to read. Added an extra source for comparison. Reformatted the entire bibliography to Turabian. And I’m still not feeling the spark of joy in it.

I’d hoped writing it out would knock whatever this ennui-inducing nonsense is right out.

No such luck.

Am I procrastinating because I realize I have to finish the edges of this at least a little so it doesn’t fray too badly even though no one will ever see it? Maybe. <Groan> Fine. Time to stab fabric with a needle repeatedly. After dinner. I may have forgotten to eat today. Maybe that’s the problem?

No, food wasn’t the issue. Just a general lack of motivation. Boo.

The second side seam is finished. Now I’m moving on to finishing the raw edge. I’m just folding the edge over by 1/8 inch or less and securing it with a running stitch at about 10 stitches per inch. It’s taking a little bit of time. I’m definitely finishing the brocade by machine – it’ll be faster and the machine will do a better job of it, especially if my serger cooperates.

Maybe I’ll actually get to the okumi tomorrow?

Onward to the Uwagi

I can tell that my documentation is getting into the shape it needs to. It’s happened at least twice now that I wanted to make sure I articulated a particular concept only to find I had already satisfied the point. Maybe I’m just forgetting what I’ve already edited…either way, the information is included and I’m pleased with how it’s communicated.

I’m also pleased with my progress today.

And my floor is clean.

So after I mopped the floor, I laid out the silk and had an easier time marking it than the previous two times. I think it being silk taffeta helped. The marking pencil drew on the fabric better than the other two weaves of silk, more easily? And I somehow managed to cut it out in a supremely tidy fashion. And you better believe that I immediately cut the angles in the okumi (overlap panels) so there was no chance of messing that up again.

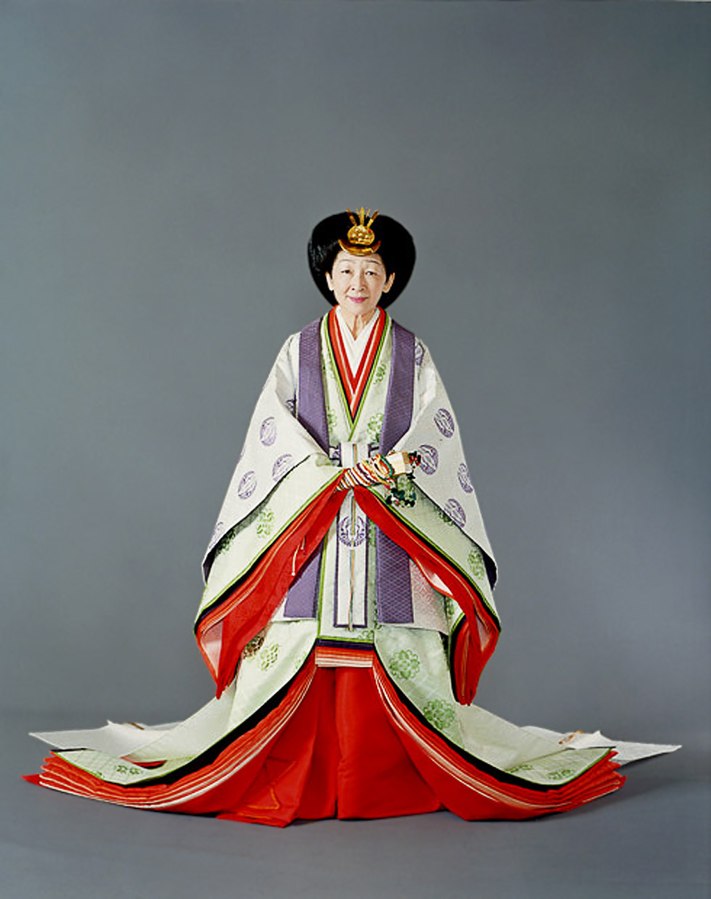
I did stray from the pattern slightly. I cut the sleeves longer. I don’t know if the garment I’m working from isn’t actually an uwagi and is some other upper layer or if it simply isn’t made to be worn with the hitoe. The pattern calls for the uwagi sleeves to be shorter than the hitoe sleeves which would cause the hitoe sleeve to bunch up in the uwagi sleeve. The sleeves are meant to nest neatly inside one another, they lay flat, see the sleeves on the court ensemble worn by Empress Michiko in November 1990:

Photo Source: Their Majesties Emperor Akihito and Empress Michiko of Japan  , Attribution:  Website of the Ministry of Foreign Affairs of Japan

Nice and flat. Nobunching from a layer being bigger than the one above it.

But it will be a day or two before I work on the sleeves. After getting all the pieces completely cut out, I marked out the body. It probably would have been a good idea to mark the okumi stitch lines too, but I didn’t. I raced ahead to sewing and have a completed back seam and one side seam to show for it so far. My goal was to have the uwagi cut out and the back seam finished, so total win!

Tomorrow’s goal is to have the okumi attached.

The pressure is on To perform at top level And beat the deadline

Competing against myself, Success lies in finishing.

A Festive Finish

The very last step My needle races through silk Sleeves pulled into place

This small pool of blue-green silk No longer shapeless. Complete.

I’ve finished the hitoe! It feels like getting an extra Yule gift!

Tomorrow work on the final garment, the uwagi, begins. I have 3 weeks. Machine stitching is a back-up, and I will do it if I have to. But I really don’t want to. So I have to sew fast and work really hard and get this garment done twice as fast as the other two.

The first step is to clear my dining room and mop the floor so I can throw silk into it again.

Fun times. At least the lining is silk. It’ll fray but not awfully. When I start cutting the brocade…yikes. I’m actually going to spend an hour or so and attempt to get my serger functioning so I can edge those pieces with it. At the very least, I will be zig-zagging/overcasting with my machine before sewing it together. But that’s a problem for *fingers crossed* next week.

Attached Collar

That’s right. It’s finally attached. I have about a day’s work left on the hitoe, attaching the sleeves and putting the tuck in the collar.

And then we move on to the uwagi. Which means mopping the floor again so I can cut silk out on it.

I wrote three poems today, all inspired by the same sunbeam. All three used the word afternoon, which I find quite funny.

Sitting in the sun The afternoon slips away And so does the light

Each day a little longer Winter Solstice come and gone.

*Edit to add* I have no idea why this post didn’t publish last night.*

Going Hard at the Hitoe

Before I went to sleep last night I made decent progress on the most current version of the hitoe plan, all the way through step 4, sewing the side seams. Ripping out the old seams (steps 5 and 6) was not something I was willing to do at 2am, so I stopped there. I think that’s a decent rule, no seam ripping or cutting after 2am. Maybe midnight.

The longer stitch length is a little hard to keep. I’m leaning heavily toward the 0.7cm side. But it is faster. It feels so weird to make such big stitches, but it does look like the “basting stitch” description.

Something I was considering, my sewing machine can not match this stitch length. That means one thing, I need to hand stitch the uwagi (upper garment). Which means I need to move faster. A lot faster. I am currently 9 days behind my original production schedule. Which isn’t so bad, and I really do think I can catch up.

Redoubled efforts Steadfastness of conviction Mind locked on the task

Banish the thoughts of failure Time must not be wasted

Hmm. I think I might like that format for the poems.

I made it through step 8 today, so tomorrow starts with step 9, attaching the okumi (overlap).

All Hail Dedication

When motivation Waxes and wanes like the moon Dedication reigns Focus, determination, perseverance her subjects.

I was struggling this morning, not wanting to do anything, much less work on something challenging (it’s collar day). So I procrastinated, doing absolutely nothing of value and lamenting my lack of motivation. And then my muse smacked me, and made me work for that poem. I struggled with the last to phrases for longer than I usually have to (my poems almost always roll fluidly from my pen – or keyboard).

I’m glad it took effort. Things that are worth it do take effort, and I needed that reminder.

I finished roll hemming the collar in the wee hours yesterday morning and then proceeded to not sleep at all. I filled yesterday with work on documentation because I didn’t quite trust myself to not make a mistake with my brain stuck on with no rest. It was a weird day. My blogpost felt weird too. But today we have a collar to attach!

The steps for attaching the collar: First I’ll lay out the body of the garment and mark the stitch line for the collar. Next I have to make small cuts along the fold or shoulder line of the garment from the center out 11.5cm. Then I pin the collar to the garment following my stitch lines. Once it’s stitched on, there are a few tucks that get top stitched in place so that the 14 cm collar becomes maybe 6 cm around the neck (7.5 inches down to 3 or so).

I’ll be pleased to accomplish all of that today. If I still have time left in the day, I’ll mark the stitch lines for the sleeves. I’m considering completely finishing the sleeves (stitching the bottoms closed and roll hemming the back edges) before attaching them to the body. That is, I think, how the instructions play out. At least so far as I can translate with an app.

Got so far a marking the collar before a mistake stopped me cold. I marked the collar with a 1cm seam allowance. Then I double checked the patterns. The collar actually takes a 4cm seam allowance. Oh dear. I checked the rest of the seam allowances for the garment. Yup. I’ve messed them up. Sigh.

I am not ripping out all of those seams to redo them. I just can’t. This garment will just be wrong. One day, far, far off in the future, I’ll take it apart and put it back together. For now, it’s a lesson and I’ll make sure the uwagi that I’m moving on to next will be more correct.

Or maybe I’ll rip it out. Ugh. I’ll investigate ripping it out. How about that?

The back seam is essentially right. That’s the only one. The side seams should be 9cm/3.5 inches. And the okumi attachment is just completely wrong. It’s supposed to be sewn on at this gentle angle that allows the collar to lay properly. Double ugh. I have to redo it. The hitoe won’t lay under the uwagi properly if I don’t.

So the new plan is thus: (1) mark the side seams with the appropriate allowance and (2) mark the sleeve attachments while I’m at it, (3) mark the migoro (body) with the angled attachment line, (4) stitch the side seams, (5) rip out the old side seams, (6) unpick/seam rip the okumi (overlap) seams, (7) iron the now removed okumi, (8) mark the proper stitch lines on the okumi pieces, (9) attach okumi, (10) attach collar, (11) finish sleeves, (12) attach sleeves.

Easy Peasy.

<insert joke about regretting my life choices as I choke on equal parts irony and sarcasm>

At least I know my plan for the next however long this takes…

OH! But there is some good news! I spent a little time trying the translating app from scratch. It’s interesting how every time it’s just the slightest bit different. I know now that it translates the kanji for okumi as “company” and that helped a lot. An entire paragraph of instructions now make something approaching sense. And I may not be able to translate the very first line quite right yet, but I got closer. I think it says, “Sew the stitches at 0.7 ~ 0.8cm, the seam allowance is .2cm to do”. The first half makes sense to me, the second part not so much. One of the diagrams shows a stitch line with the gap between stitches called out at 0.8cm. The stitch itself is the same length as the gap but is not labeled. Knowing what I do about garment construction, I am leaning toward sewing things with a 0.8cm stitch length. I have to do it all again anyway, so why not try to do it better? So the good news is I should stitch faster once I get the new stitch length down. And the longer stitch length makes sense. 10 stiches per inch is not all that much like the “basting stitch” I’ve always heard described but about 3 stitches per inch definitely does. It’ll be a major adjustment.

What was it I wrote at the start of this entry, about things being worth it being hard? Yeah. I’m feeling part of that on a deep level. Quite the lesson for the day. But it’ll be worth it.

Side Seams and Fabric

The additional brocade to fill out what I already had has arrived. It matches. All is well.

Beautiful brocade / light gold with darker flowers / Has graced my table / How much more delightful will / it be sewn into a robe?

I’ve moved on to the side seams of the hitoe.

Follow by Email
YouTube
YouTube